|
|
 |
|
Install
A Countertop
New cabinets have a powerful effect on
a kitchen remodeling project. In terms of layout and budget, few
improvements carry more weight. But when it comes to visual impact,
countertops can play an equally important role. Using color, texture,
and edging details, countertops easily hold their own alongside
vast expanses of cabinetry.
With a rainbow of colors to choose from, not to mention the variety
of materials available, it’s a sure bet you can get the unique
look you want. And, if you’re searching for ways to revitalize
your kitchen without financing a second mortgage, paint and new
countertops may offer the adrenaline boost your tired old decor
needs.
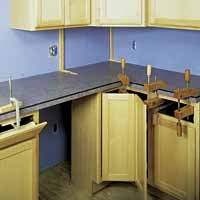
In our case, we added custom countertops to the new Merillat cabinets
we installed recently in contributing editor Bob Settich’s
kitchen. (Installing Cabinetry)
Many materials were ruled out early because they simply weren’t
within the budget Bob and his wife Barbara had set for the project.
What the budget allowed was plastic laminate covered countertops.
Bob considered going to a local building center to purchase postformed
units — those with the backsplash and edging formed in one
piece — but in the end opted for site-built countertops. The
chance to pick a laminate and add edging of their choice was a big
factor in the decision. They also liked the idea of a seamless corner
— a feature I’ll explain later.
They selected laminate (4556-60 Scopia) for the counter surfaces,
and picked a backsplash (SS profile) and edging (SE style), all
from Wilsonart. The edging and backsplash have a thin accent stripe
that breaks up the expanse of the counters.
Making it Seamless
Once the Settichs made their decisions,
we went to work. The first thing we did was order Medex for the
base layer, or substrate. Medex is a water-resistant version of
medium-density fiberboard (MDF). It’s stable, smooth, and
flat, and we found it easy to trim, despite the clouds of fine dust
that billow up when you machine it.
Creating invisible seams with laminate is difficult, and often seams
become glaringly obvious over time as water seeps in from repeated
washings. So we also ordered a sheet of laminate 5 ft.-wide by 12
ft.-long that let us cover our L-shaped counter with one piece (Countertop
Construction View). The leftover piece was used on a small auxiliary
countertop.
To fashion the countertop substrate from standard 4 ft. x 8 ft.
sheets of Medex, we cut the corner as one section and butt-joined
the leg piece to one end. This ensured the corner piece remained
flat, and, given the heft of Medex, this two-piece assembly made
the countertop easier to handle.
We built up the thickness of the edges wherever necessary by gluing
4"-wide cleats to the underside of the substrate (Figure 1).
This assured that the countertops would contact all base cabinet
walls to provide adequate support.
I recommend cutting the leg section 2" longer than its finished
length to allow for final fitting. And I feel strongly that reinforcing
the butt joint with biscuits makes good sense (Figure 2). (But hold
off gluing the joint together for now.) |
 |
 |
| FIGURE
1 - Build up the substrate edge thickness by gluing 4"-wide
cleats of Medex to the bottom sides of the countertop substrate. |
|
 |
| FIGURE
2 - Building an 11'. long countertop from standard 4'
x 8' materials required us to splice the substrate using biscuits. |
|
|
Scribing
the Fit
Fitting a countertop is a multi-step process
that requires accurate measuring and marking. To be successful,
you must reference the substrate to the front edge of the base cabinets
so you have the same amount of overhang at all points. At the same
time, you want a close fit against the walls.
Lay a section of substrate atop the cabinets, and establish the
overhang from the face of the base cabinet (Figure 3). We began
with the corner section since it had to fit against two walls (which
happened to be slightly out of square).
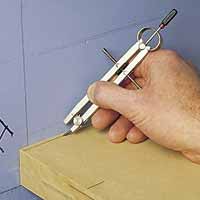
After aligning the substrate with the base cabinet, we found the
point where the substrate and wall were farthest apart, and set
a compass to that distance. Then we scribed the substrate (Figure
4).
Don’t worry about minor gaps — they’ll be covered
by the backsplash. The main concern is to get the front edge of
the substrate parallel with the base cabinet faces.
If you need to remove a lot of material, use a jigsaw to rough out
the cut (Figure 5). A belt sander works well for “sneaking
up” to the scribe line (Figure 6). Tilt the sander slightly
to undercut the edge. This will make it easier to adjust the fit
against the wall. |
|
 |
| FIGURE
3 - The edge of the substrate must be parallel to the
face of the base cabinets to ensure a uniform overhang. |
|
 |
| FIGURE
4 - Once the substrate is aligned parallel with the
front of the cabinets, scribe the back edge to the wall using
a compass. |
|
 |
| FIGURE
5 - Use a jig saw to cut the substrate roughly to your
scribe line, keeping to the waste side of the scribe line. |
|
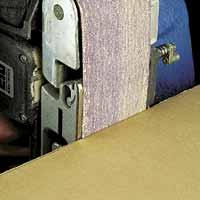 |
| FIGURE
6 - Complete the trimming to the scribe line using a
belt sander. Tilt the sander slightly to undercut the edge for
a better fit. |
|
|
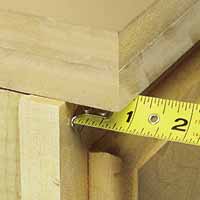
Satisfied with
the fit of the corner piece, next we turned our attention to fitting
the leg section. In Bob’s kitchen, the end of this piece also
butts against a wall, so we couldn’t just cut it to length;
we also had to scribe the end for a tight fit.
First, we laid the leg on top of the base cabinets and corner section,
butted its end against the wall, and established the uniform overhang.
Then we measured the amount the leg overlapped the corner section
at the butt-joint. After writing this measurement down, we measured
the widest gap between the wall and the other end of the substrate.
Then we added the gap and overlap measurements plus 1/8".
Using this sum, we set our compass and scribed the substrate’s
end to the wall. By cutting along this scribe line, we also trimmed
the leg to the proper length. |
|
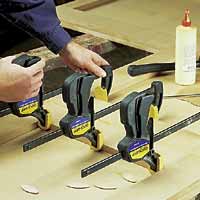 |
| FIGURE
7 - Once its trimmed to fit, place the substrate sections upside down on a level surface, then glue and clamp them together. |
|
Accurately
fitting the back edge of the leg to the wall could only be done with
the leg dry-fitted to the corner piece (with biscuits installed).
Bob and I slid the substrate assembly against the wall, checked the
alignment with the cabinet fronts, and scribed the back edge of the
leg.
Once the back edge was trimmed to shape, we slid it back into place
to check the fit. |
 |
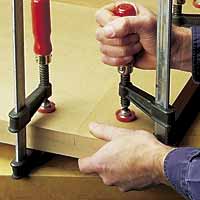
When
you’re satisfied with the fit, remove the substrate sections
and place them upside down on a flat surface. Squirt glue into the
biscuit slots and run a bead along the ends to be joined, then clamp
the assembly together (Figure 7). In a few hours, turn the substrate
over and scrape off any squeeze-out. If necessary, apply wood filler
to any low spots, and sand it smooth.
Laying the Laminate
Our laminate arrived a couple of weeks
after we ordered it and came loosely rolled up in a cardboard carton.
I carefully unfurled it the day before we planned to attach it,
laying it flat to remove any “memory” of being curled.
When laminating large pieces, I allow at least two inches of overlap
on all sides. This way, I have little risk of misaligning the laminate
on the substrate once the contact cement is applied — errors
here are tough to undo.
Apply two coats of contact cement to both the laminate and substrate,
and use spacer sticks to hold the laminate above the substrate until
you have it positioned. After removing the spacers, secure the bond
by working over the entire surface with a roller. Trim the excess
with a router and a flush-cut bit.
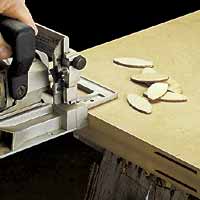
Adding the Edging
Our edging had a tongue for mounting it
to the substrate. The tongue fits in a groove that we had to rout
in the appropriate edges of the substrate (Figure 8). Because this
edging precisely overlaps the countertop laminate, the grooves had
to be positioned with dead-on accuracy.
Using the special slot-cutting bit we purchased with the edging,
we routed test grooves in scrap to set the router depth. Then we
routed the grooves in the countertop.
We cut all edging for the countertop a couple of inches long, and
started our fitting process at the inside corner of the “L”.
Once we had a tight-fitting miter there, we marked and mitered the
opposite ends, then mitered mating pieces for the outside corners.
We cut these last pieces to length so they butted against the walls.
Apply water-resistant wood glue to the edging, and clamp it firmly
in place (Figure 9).
After checking the fit one last time, we applied construction adhesive
to the top edges of the base cabinets and carefully set the countertop
in place. Braces, wedges, and clamps held it firmly in place overnight
(Figure 10).
Before removing the braces, we drilled holes through the cabinet
corner braces and drove screws into the substrate cleats (Figure
11).
|
|
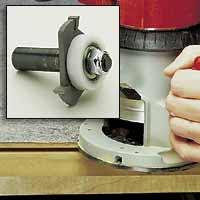 |
| FIGURE
8 - Using the slot cutting bit sold by the edging manufacturer,
rout the edging mounting groove in the edge of the substrate. |
|
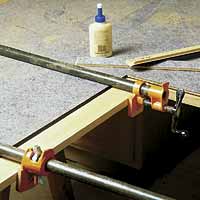 |
| FIGURE
9 - After fitting the mitered ends of the edging, glue
the long edging piece in place, using cauls to apply clamping
pressure evenly. Then glue and clamp the remaining edging. |
|
 |
| FIGURE
10 - Install braces against the upper cabinets near the
back edge and clamps along the front. These hold the countertop
firmly in position until the construction adhesive dries. |
|
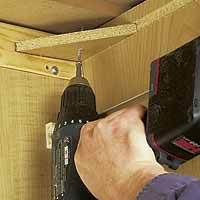 |
| FIGURE
11 - Before you remove the bracing, drill pilot holes
through the cabinet corner braces, and drive screws into the
substrate cleats. |
|
|
Finishing
Up
The only task remaining was to install
the backsplash. Using a ready-made backsplash made this final step
a simple process.
Since Bob’s walls were somewhat out of square, we decided
to cope the corners instead of miter them — it was actually
easier and gave us tighter joints (Figure 12).
The long piece went in first, then we coped the short pieces to
fit against it. Even though Bob planned to install a row of ceramic
tile above the backsplash, we scribed and trimmed it to get good
contact along the wall. We applied a thin bead of adhesive to the
back and bottom edge of each backsplash piece, and pressed them
into place (Figure 13). We took care to clean up the squeeze-out,
and when the adhesive set up, we caulked the seam with clear silicone.
While we wanted to stand back and admire our handiwork, Barbara
reminded us that the kitchen still needed the sink and appliances
installed. At least she was willing to overlook the plywood underlayment
on the floor — for the time being. We plan to wrap up that
final phase of this kitchen remodeling project with laminated wood
flooring. We’ll be done soon, Barbara. We promise! |
|
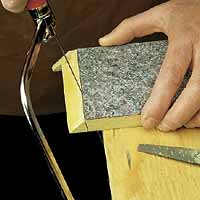 |
| FIGURE
12 - Miter the end of the backsplash, then use a coping
saw to trim away the excess, following the edge of the laminate. |
|
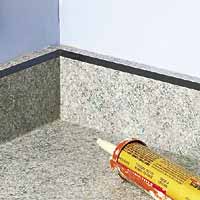 |
| FIGURE
13 - Install the longest piece of backsplash first, then
install the coped piece against it. A bead of caulk wraps it
up. |
|
|
|
|