|
|
Post-Formed Countertops Simplify
Installation
Post-formed countertop is a readily available product that simplifies
installation since the laminate is already applied and the backsplash
and edging are integral parts.
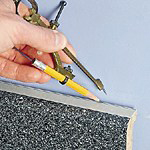
The key, as with any countertop, is to make sure the countertop aligns
parallel to the front face of the base cabinets before you scribe
it to the wall.
A lip on the rear edge of the backsplash allows you to easily trim
up to 1/4" when fitting it to the wall (Photo 1).
When you cut post-formed countertop, use a fine-toothed crosscut blade
and saw through the backsplash first (Photo 2).
Then clamp a board to the bottom of the substrate to hold your saw
flush with the edging cleat and guide the blade as you make your cut.
You can order pre-mitered pieces to make right-angle turns (Photo3).
A bead of silicon sealant and drawbolts are used to join the two pieces,
making the mitered joint tight and flush (Photo 4). |
 |
 |
| PHOTOE
1 - After aligning the front edge with the cabinets,
scribe the backsplash to the wall with a compass. |
|
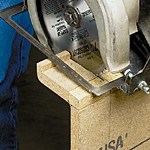 |
| PHOTOE
2 - To cut a post-formed countertop, begin by sawing
through the backsplash with a fine-toothed blade. |
|
|
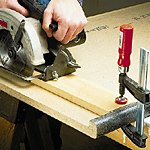 |
| PHOTOE
3 - A board clamped to the bottom raises the saw flush
with the edging lip and guides the saw. |
|
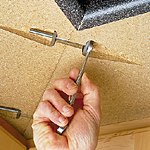 |
| PHOTO
4 - After applying a bead of silicon caulk, use drawbolts
to pull the countertop joint tightly together. |
|
 |
|
|