|
|
| SUBSCRIBE |
| FREE Preview Issue |
| Give A Gift |
| Renew |
| Magazine Customer Service |
| Resources |
| Contact Us |
| Home | Online Preview |
Current Issue |
Builders Plans |
Online Extras |
Videos |
| Issue #246 - April 1998 |
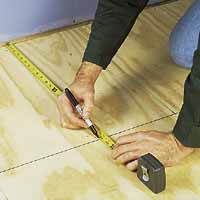
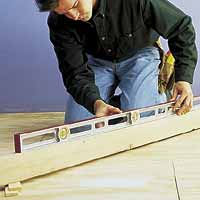
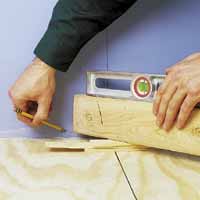
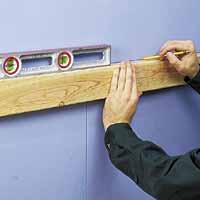
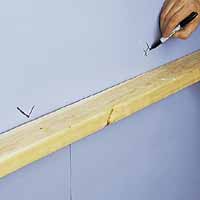
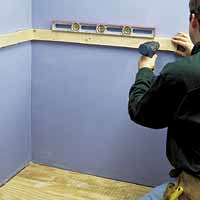
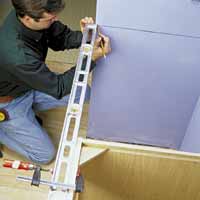
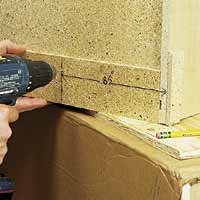
| Installing Cabinetry The cabinets themselves aren't the problem. They're just large wood boxes with a lot of straight lines, square corners, and straight forward joinery in the face frames and doors. Remodeling a kitchen means more than new cabinets, though. Doing the job right means thinking about electrical and plumbing connections -- especially any changes to make during the renovation -- plus other decisions about countertops, flooring, and the like. As the scope of the project becomes clearer, a home-shop woodworker might wonder whether building his or her own cabinets makes much sense. Even if you have the tools you need and feel confident your skills are up to the task, you'll be adding another layer to an already complicated project. Besides, it takes a lot of shop space to assemble an entire set of cabinets, and you can have the kitchen torn up for weeks if you do the installation piecemeal. A compromise might be the best solution -- think about buying manufactured cabinets and doing the installation yourself. Ready-made cabinets will of course cost more than the raw materials, but the money you save doing the installation can help offset that expense, and you'll likely get the project organized, underway, and finished a lot sooner. Focus on Planning When the Workbench staff started planning a series of articles on a kitchen remodel, we knew using manufactured cabinets would be a choice many readers could make. Bob Settich, our contributing editor, had just the site for us, and he'd been planning a renovation for over a year. While he began the demolition of his old kitchen and did some electrical work, we discussed the material options for the new flooring and countertops. Since Bob and his wife were going to live with the kitchen, they got the deciding vote on these matters. For the cabinets, they chose a Merillat design ("Spring Valley") in a natural maple finish. These were ordered from a local distributor and arrived about two weeks later. Establishing Layout Measuring and marking the kitchen accurately is the critical first task. You'll have some irregularities to deal with, so knowing the terrain is essential. Layout marks on the walls and floor will indicate not only the cabinet placement and stud locations, but where adjustments or shims will be required. The primary guides are the base and upper cabinet level lines, but you need to work up to them. First, mark lines on the floor 22" from the walls where the toe kicks of the base cabinets go (Figure 1). Within that zone, use a level and a straightedge to locate the highest spot on the floor (Figure 2). Then transfer that height mark from the floor to the walls (Figure 3). When the base cabinets are installed, their bottom edges will have to be shimmed so they all line up level to this mark. It's much easier, though, to use the top edges of the cabinets for your reference. First, measure up 34-1/2" from the mark you just placed at the bottom of the wall. Then use the level and straightedge to mark a line around the walls at that height (Figure 4). This becomes your base cabinet level line, the reference for the top edges of all the base cabinets. With the countertops installed (adding 1-1/2"), your work surface height will be at the 36" standard. While you're at it, mark another level line 19-1/2" above the first one. This will be the reference line for the upper cabinets. |
|
|
||||
|
|
||||
| The layout marks you've made so
far provide a rough picture of the base cabinet placement, but you
still need a more detailed map. The wall surfaces affect the cabinet
alignment, so use a straightedge to locate and mark any high and low
spots (Figure 5). The low spots may require shims behind the cabinet,
and severe bulges in the wall might push the cabinets over the toe
kick baseline. Mark also the wall contours in the area where the upper
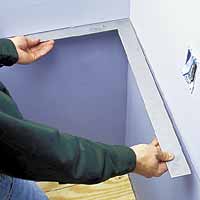
cabinets go. Finally, check any corners with a framing square (Figure 6). If a corner is out-of-square either way, the cabinet placement (and countertop) will have to be adjusted to compensate and to keep the cabinet faces in a straight line. More often than not, the irregular angle stems from a buildup of plaster or drywall joint compound in the corner, not from an entire wall that's misaligned. The offset is usually confined to the immediate corner area, so the gap behind the cabinets won't keep growing larger. |
|
|
||||
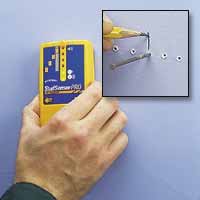
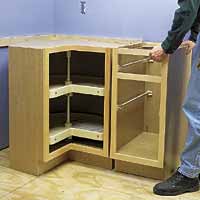
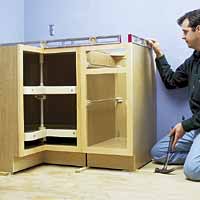
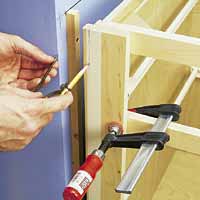
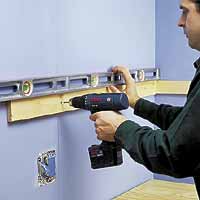
| Where the Studs Are Locating the wall studs wraps up the layout marking procedure, and it's as critical as the other steps. Each cabinet must be solidly anchored, and no surface material -- wallboard, lath and plaster, or wood paneling -- will do the job like structural framing will. The base cabinets get nearly all of their support from the floor, so fastening them to the wall just keeps everything lined up and steady. The uppers, though, rely solely on the fastener connections to keep them afloat, and the studs provide critical muscle. A magnetic or electronic stud finder will indicate where studs are buried in the wall (Figure 7), but don't stop there. Pipes and electrical conduit can create false readings, so don't rely on guesswork. Drive a 6d nail to locate the edges of each stud you find, and mark the center. Never assume that the spacing will be the standard 16" on-center. Window and door openings, plumbing vent stacks, and just plain shoddy carpentry may have positioned some studs off of the layout you expect. Here Come the Cabinets When your cabinets arrive, you'll get some paperwork telling how to unpack them and check for shipping damage or other problems. Inventory and measure each cabinet so you know your order was filled correctly, and remove all the doors, drawers, and shelves. Odds are you'll have at least one corner to deal with in your project, and that's where the installation begins. If not, start at an end unit. Bob opted for one-piece corner cabinets -- one base and an upper unit -- but manufacturers also offer separate cabinets made to fit together. Bob's "pie cut" base cabinet features a rotary shelf system, and the back wraps around in a three-quarter circle rather than a sharp 90° corner. This type of construction is less affected by wall irregularities, but it doesn't provide full support for a countertop. To compensate, we attached two 1x4 cleats to the walls, fastening them to the studs (Figure 8). Because the back of our corner cabinet didn't extend to the wall, we had to secure it by connecting it to adjacent cabinets (Figure 9). First, we set the units next to each other and shimmed underneath to align and level them (Figure 10). |
|
|
||||
|
|
||||
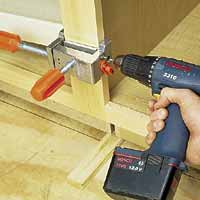
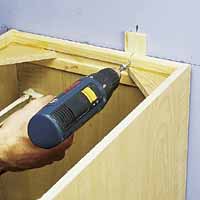
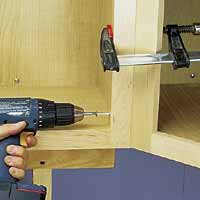
| As soon as they lined up, we clamped
the cabinets together at the face frames (Figure 11). Standard bar
clamps will work, but we used this opportunity to try out a new special-purpose
tool from Adjustable Clamp Company. Dubbed the "Cabinet Claw,"
this new clamp is designed expressly for the installation of face
frame cabinetry. Its aluminum jaws pull the frames of two cabinets
together, and a front clamp aligns them flush with each other. You can align and fasten together an entire section of base cabinets before you secure them to the wall. When you're ready to cinch them down, drive screws through the cabinet's back rail and into the wall studs (Figure 12). If a shim is required, place it directly over the stud, drill a pilot hole, and send the screw right through it. |
|
|
||||
| Incidentally,
never use nails to fasten the cabinets in place, especially the uppers.
Aside from voiding the manufacturer's warranty, this shortcut almost
guarantees that the cabinet and wall will part company at some inopportune
moment. There's a reason the force that brings objects crashing to
earth is called the law of gravity. Not the suggestion of gravity.
Not the useful notion. The law. If the end of the cabinet run butts against another wall, you'll probably need a filler strip to make up the last few inches. Custom cabinets are built to fit so spacers like this aren't required, but with standard cabinet sizes you almost always have to make up the gap with trim. Cabinet manufacturers anticipate this, and offer filler boards in various widths. They're the same thickness and species as the face frames, and prefinished, so using them doesn't really slow you down that much. If your installation requires this technique, leave the last cabinet detached from the rest of the group. Clamp a straightedge to the face of the nearest installed unit, extending far enough for you to put alignment marks on the end wall (Figure 13). Allow a 3/4" offset behind those marks (for the thickness of the filler piece) and fasten a cleat to the wall. Then install and fasten the last cabinet and measure the gap between its face frame and the wall. If the wall is flat, simply rip the filler board to the required width and fasten it in place. If the wall is irregular, you'll have to scribe-fit the filler board (Figure 14). Start by setting a marking compass to the width of the gap, then place a strip of 1"-wide masking tape along the filler board in the area where it needs to be trimmed. Clamp the board to the end cabinet's face frame, then trace the wall contour with the compass. Remove the board and cut along the scribe line with a jig saw, then reinstall it to check the fit. When it's right, drive screws through the adjacent face frame into the edge of the filler board. Nail the other side to the cleat (Figure 15). |
|
|
||||
|
|
||||

| Working Your
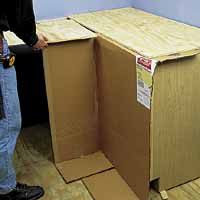
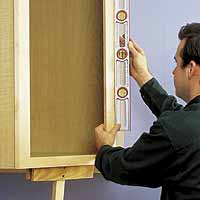
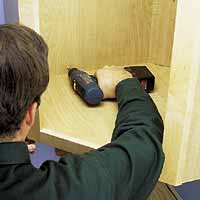
Way Up The temptation to take a break at this point was very strong, but we dove right into the installation of the upper cabinets. The sequence is similar to that used for the base cabinets, though you don't have the floor to support the weight of the cabinets. We made a pair of T-braces to help out here. Glued and nailed together from scrap stock and plywood, these 19"-tall braces propped up the front of the upper cabinets as we installed them. We also cut some plywood for temporary countertop surfaces. This gave us a place to set tools, and provided support for the T-braces. Before hanging the first cabinet, though, we had some prep work to do. First, we cut up some of the cardboard shipping cartons and used them to protect the base cabinets (Figure 16). (Be sure to remove any staples from the box flaps -- they can scratch the finish.) If you'll remember, earlier we marked a second level line on the walls, 19-1/2" above the base cabinet level line. This line marks the bottom edge of the upper cabinets. Allowing 1-1/2" for the final countertop thickness, we'll have the standard 18" clearance between the upper and base cabinets. The T-braces provide an extra "hand," but alone they can't support the cabinets. The bulk of that chore actually falls to ledger boards fastened to the wall along the level line (Figure 17). These are only temporary, but they'll be supporting nearly the full weight of the cabinets, so make sure you screw them to the studs. Again, we started the installation at the corner and used a one-piece unit, but this cabinet had a square back rather than the "pie cut" shape of the base cabinet. Before lifting any of the upper cabinets into place, predrill screw holes through the top and bottom hang rails (Figure 18). Use the cabinet layout and stud location marks on the walls to transfer measurements to the cabinet backs (note the spacer on the cabinet side, which registers the 1/4" offset of the face frame). When used properly, this system ensures you'll hit studs when you drive the mounting screws. Set the corner cabinet on the ledger board, prop the T-brace under the front, and check the frame for plumb (Figure 19). Insert shims behind the cabinet where necessary, and when the unit's aligned to your satisfaction, screw it in place (Figure 20). Except that you won't be hanging large assembled groups of upper cabinets as a single unit, the rest of this procedure resembles the sequence used for the base cabinets. Our upper corner cabinet had a 45° face frame, though, so we used conventional bar clamps rather than the "Claws" to hold the adjacent cabinets while we fastened them (Figure 21). As you work, keep the face frames aligned and flat. Any twist will affect the fit of the doors. |
|
|
||||
|
|
||||
|
|
||||
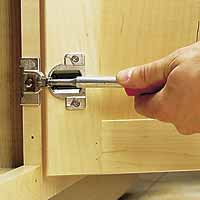
| Wrapping up the Details When the last upper cabinet has been secured, you can start reinstalling the doors. The shelves and drawers block your access to the inside of the cabinets, so leave them out until the doors are on. Also, keep the ledger boards in place for now. Fitting the doors usually reveals any problem with your installation, because if a cabinet face has been twisted out of plumb its door(s) won't lie flat against it. You might have to back off the mounting screws to adjust your shims, and leaving the ledgers in place keeps the cabinet supported while you do this. Most of the European-style cup hinges have a built-in adjustment feature, so you may have some room to tweak the fit without fussing with the cabinet (Figure 22). We'll be covering the countertop installation in another article, but fastening those also requires getting your head and arms inside the base cabinets. Don't bother reinstalling those shelves and drawers until that step is complete. Finally, install trim along the toe kicks to hide any shims or gaps between the cabinets and the floor. Also, you may want to add a cornice molding to dress up the top of the cabinets. |
| ©
August Home Publishing Company Magazine Customer Service - Privacy Policy - Terms of Use - Contact Us |