|
|
 |
| Roofing Basics |
 |
 |
|
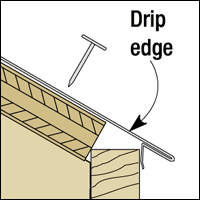
| Figure 1a Drip-edge
flashing keeps water away from the roof structure. Nail it to
the sheathing along the lower edges of the roof. |
|
 |
|
| Figure 1b |
|
|
|
Issue
#301 - June 2007
Many do-it-yourselfers feel that roofing is a job that's best left
to a professional. And when it comes to roofing an entire home, they're
probably right. But roofing a smaller structure, such as a storage
shed, is well within the grasp of any do-it-yourselfer.
That's because a shed or garage roof is usually a very simple structure,
with no valleys, dormers or other obstructions to work around. Plus,
you can use basic three-tab asphalt shingles, which are the easiest
to install of any shingles. All you need to install them are a few
tools, and a ladder or two. But before that, you need a basic understanding
of how a roof works. And the easiest way to get that understanding
is to examine a roof layer by layer, from the outside in.
The layer that you see, and the one that does the lion's share of
the work on a roof, is the shingles. A roof keeps water out by managing
where the |
water goes. Water
naturally runs downhill, of course, so the shingles get laid in
overlapping rows, with each shingle partially covered by the shingle
above it. That way, as water flows down the slope of the roof, it
simply runs from one shingle to the next until it reaches the edge
of the roof and runs off.
What might surprise you is that the shingles don't completely seal
the roof. They have tabs of adhesive to help them stick together,
but that's there more to keep them from being peeled up by wind.
Because of this, it's possible for water to get under the shingles.
So before the shingles go on, a layer builder's felt gets laid down
over the wood roof sheathing to provide a second layer of protection.
If any water gets under the shingles, it runs onto the felt rather
than soaking into the sheathing.
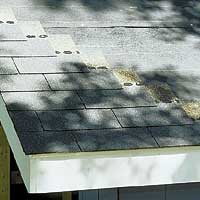
The last layer is the drip edge. It goes around the perimeter for
the roof to prevent water from running under the edges of the shingles.
Installing the drip edge is where your roofing job begins. It gets
installed in two phases, First, drip edge gets nailed in place along
the lower edges of the roof (Fig. 1a &
Fig. 1b).
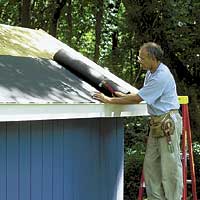
Next, you need to staple on the felt. It comes in rolls rated as
either "15-lb." or "30-lb." While most shingles
demand only 15-lb. felt, the 30-lb. felt is more durable and costs
only marginally more. Start at the drip edge and work up, overlapping
each course (Fig. 2).
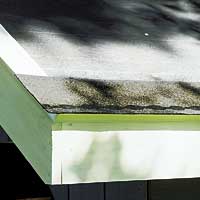
Now you need to complete the drip edging by nailing it along the
ends, or rakes, of the roof. It goes on top of the felt to help
hold it down and prevent it from curling.
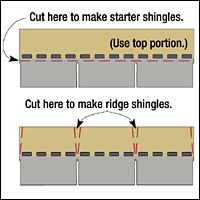
A starter course of shingles is next. Make these by cutting the
tabs off full shingles and nailing on just the top portion (Cutting
Shingles). Then nail the starter course to the roof so the edges
and ends are flush with the drip edging (Fig.
3).
|
 |
|
 |
|
| Figure 2
Builder’s felt is the first layer of protection for the
sheathing. Cover the drip edge and work up. Add rake flashing
at the ends. |
|
|
|
 |
|
| Figure 3
A starter course makes for a double layer of shingles at the
bottom edge of the roof. Cut the tabs off regular shingles to
make these. |
|
|
| A course of full
shingles goes directly over the starters. But don't just lay a full-width
shingle over the starter. You need to stagger all end joints by 6"
to prevent water from seeping between the shingles. This 6" offset
that is repeated with each new course (Fig.
4). |
|
|
 |
|
| Figure 4
Offset the end joints of each course 6" from the one below.
You can use the remnants from cut shingles as starter pieces
above. |
|
|
|
|
| Now you can work
your way up the roof with additional courses of shingles. Common shingles
measure 12" tall by 36" wide and have two partial slits
that divide the lower half into three “tabs.” Once the
starter and first full course are down, position each layer to leave
about about 5" of the course below exposed. This is called the
reveal. |
|
|
 |
|
| Figure 5
After nailing on a ridge vent, cut the shingles into into 12"-squares
for the ridge. Nail them in place with a 5" reveal. |
|
|
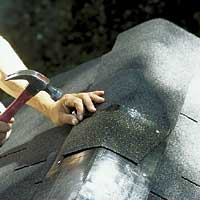
Once you
work your way to the top of the roof from each side, you'll need to
cover the area where the sides meet. This is called the ridge. If
you're installing a ridge vent, it goes on first. Then it gets covered
by ridge shingles that are made simply by cutting down regular shingles
(Cutting Shingles). Then these ridge shingles get nailed in place
(Fig. 5). |
|
|