|
|
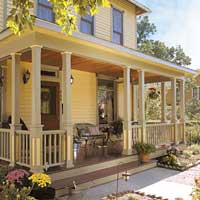
| Perk Up A Porch |
 |
| 3 simple
ways to improve your home's curb appeal |
 |
| Nothing says "welcome"
like a front porch - unless it happens to be an old porch that has
fallen into disrepair, or one of those tacked-on afterthoughts with
spindly posts you sometimes see on newly constructed houses. One sure
remedy for either situation is to give your front porch a "facelift."
In this article, we're featuring three projects that do just that. |
 |
|
Composite
Flooring - The first improvement is to install tongue-and-groove
flooring made from a durable, low-maintenance, weather-resistant composite
material. And the best part of all - it looks just like old-fashioned
porch flooring.
Post Cladding - The second upgrade
is to add cedar cladding to "beef up" the 4x4 posts that are typical
on many porches. This will make them look more like architectural
porch columns.
Porch Railings - Finally, we explain
how to build a simple railing and add decorative trim that integrates
it into the columns.
Flooring
One dramatic improvement you can make to a front porch is to install
new flooring. For this project, I wanted to re-create the feel of
an old-fashioned porch. If you look at the Photo at top, I think you'll
agree this painted flooring gives it that warm, inviting appeal of
yesteryear.
A Solid Foundation - Aesthetics aside
though, the floor must be solid without any "give" when you walk on
it. That stability comes from the footings and framing beneath the
porch (Illustration, below).
If you're working on an existing porch, you'll have the perfect opportunity
to examine these structural elements firsthand - after you tear off
the old flooring. To shore up the framework, you may have to replace
rotting boards, add bridging to take the "bounce" out of the floor,
or perhaps "sister" a new joist to one that's sagging.
Depending on the condition of the porch, you may want to hire a contractor
to do this work. That's also a good idea if you're adding a new porch,
as building the structure of a porch can be a fairly complicated process.
Installing the Flooring
That will free you up to concentrate on the most visually appealing
elements of the porch - like the flooring. On this porch, the flooring
runs perpendicular to the house (Illustration, below). In a nod to
the olden days (and to ensure a rock-solid installation), I used tongue-and-groove
flooring. But not just any old tongue-and-groove flooring, mind you.
|
 |
|
| FLOOR
ASSEMBLY |
|
| To minimize maintenance
and create a durable, weather-resistant surface, I used a composite
material called Tendura Classic (Photo 1). It's a mixture of wood
fibers and plastic (hence its longevity), which you'd never guess
by looking at it. Tendura looks so much like traditional wood flooring
that it's actually used for historical restorations. That made it
ideal for this project. |
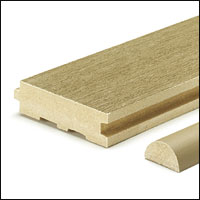 |
| PHOTO
1 - For a durable, low-maintenance surface, we used
a pre-primed composite called Tendura Classic for the tongue-and-groove
flooring and half-round trim. |
|
|
| Starting
Square - The key to making sure the floor will be square to
the front of the house is to carefully lay out the the first strip
of flooring. If it isn't square, the rest of the boards will also
be "off," compounding the problem as you work your way across the
porch. The Box below outlines a simple method for starting off square. |
|
| Start Square
- Stay Square |
To square the
first flooring board to the house, I used the concept of a “squaring
triangle.” It’s based on the fact that a triangle
with a 3:4:5 ratio will yield a perfectly square 90° angle
in one corner.
Start by laying out two “legs” of a triangle (one
4’ and one 3’ from the corner of the porch). If
the distance between these points is 5’, the board is
square.
After installing about every three or four boards, measure between
the last board and the end of the porch at several points along
the board. The measurements should be the same. If not, make
a very small adjustment in the next board. |
|
|
Before installing the
first board, you'll need to rip the groove from the edge of the piece
(Fastening Detail, Front View). This produces a square edge, to which
you will later attach a half-round trim piece.
As for the length of the board, there are two things to consider.
First, to allow for expansion (yes, even composite material expands),
you'll want to leave a 1/4" gap between the end of the board and the
house. It's also a good idea to allow for an ample overhang on the
front of the porch (Edging Detail). This way, if the porch framing
is out of square, the overhang will make any discrepancy less noticeable.
|
|
|
| FASTENING
DETAIL (FRONT VIEW) |
|
|
| EDGING
DETAIL (END VIEW) |
|
With that in
mind, position the board so its cut edge overhangs the side of the
porch. This board and the one that's installed next are simply face-fastened
with screws, creating a solid backstop for subsequent pieces.
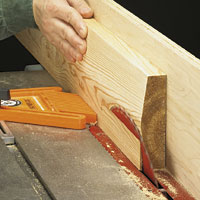
A Tool You'll Need
- To install most of the remaining flooring, I rented a pneumatic
floor nailer (Photo 2). It drives a fastener at a 45° angle through
the tongue and into the joist. To operate it, set the nailer right
on the flooring, and then strike the plunger with a mallet.
Using the nailer, installing the boards should go smoothly and quickly.
As you work your way across the porch, some boards will have to be
notched to fit around the posts. Here, a wood cleat will help support
the flooring (Photo 3). |
|
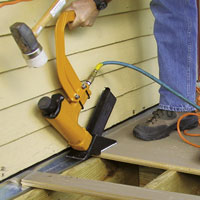 |
| PHOTO
2 - A floor nailer drives nails at an angle into the
tongues of the flooring. |
|
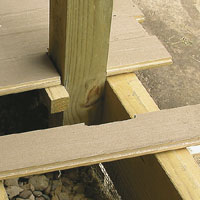 |
| PHOTO
3 - A cleat attached to the post supports notched boards. |
|
|
When you get
to the opposite end of the porch, rip the tongue off the last board
(again, for the half-round trim). As before, face-fasten the last
two boards. Then attach a half-round trim piece on the three sides
of the porch perimeter and a strip of quarter-round next to the house.
Just Finishing - To finish off the
floor, I painted the Tendura, which came pre-primed. It's important
here to use the type of paint recommended by the manufacturer.
Post Cladding
Typically, 4x4 pressure-treated posts are used to hold up a porch
roof. They're strong enough for the job, but they just look skinny.
One way to achieve a more proportional look is to wrap the posts with
3/4"-thick cedar boards. That is, to clad the posts. |
|
To
clad the posts on this porch, I used a three-step process that involves
cladding the lower posts, adding a decorative mid-cap, and installing
the upper cladding (see Illustration below).
Locking Rabbet Joints
- The cladding is assembled with locking rabbet joints. This is a
strong, durable joint that, when glued with exterior glue, stands
up to the worst weather.
Start with Lower Cladding
Essentially, the cladding is a "box" that's built around the post.
For easy assembly, it's built in two L-shaped sections that fit
around the post.
The size of this box is important. You don't want it to fit too
tightly around the post. If the post twists, the joints - strong
as they are - could "blow" apart. The solution is to build in a
"fudge factor" - that is, a gap between the box and the post to
accommodate possible post movement. |

|
|
Most of the
cladding work is done in the shop. Using the dimensions shown in the
construction view, go ahead and rip the cladding pieces to width (4-7/8"
in my case) and crosscut them to length. Next, cut the locking rabbet
joints. Then, make each of the two L-shaped halves by
gluing two pieces of cladding together. At this point, you're
ready to transport the cladding to the job site and install it. This
is a simple, three-step process.
Just a note here. To ensure that the porch railings will align with
each other once they're installed, the face of the post to which you
attach the first L-shaped section of cladding is important. This face
is, in a sense, your "true north." The idea is to attach that first
L-shaped section to that same relative face on each post. |
|
|
| CLADDING
A POST— EASY AS 1-2-3 |
|
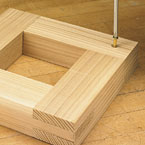
Add the Mid-Caps
To create a visual "break" between the upper
and lower cladding, I added thick mid-caps to the posts. Each mid-cap
is a frame made of 1-1/2"-thick cedar (Mid-Cap Assembly). Like the
cladding, the idea is to make two-L-shaped sections, and then assemble
them around the post. |
|
|
| MID-CAP
ASSEMBLY |
|
|
Once again, making mid-caps that would withstand the weather was high
on my priority list. So this time, I used open mortise and tenon joints
to assemble the mid-caps (see mid-cap assembly, below). |
|
|
| MID-CAP
ASSEMBLY |
|
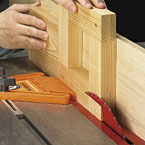
To shed water, the
mid-caps are beveled on their upper face. Cutting these bevels is
easiest to do if the mid-cap is completely assembled. The problem
is the two L-shaped sections of the mid-cap have to fit around the
post, so you can't actually assemble it until you're at the job site.
The solution is to glue two pieces together to form the L-sections,
and then temporarily join the two L-sections with screws. (Fig. 1,
below). Be sure to keep the screws out of the path of the saw blade.
But just in case, it's best to use brass screws. That way, the blade
won't get damaged if it accidentally nicks one of the screws.
Now you can go ahead and make the bevel cuts on the table saw (Fig.
2). Of course, you'll need to disassemble the mid-caps before installing
them on the posts (Fig. 3). After gluing the halves together, simply
toenail them to the post. |
|
 |
| FIGURE
1 - In order to cut the bevels on the top face of each
mid-cap, temporarily assemble the two unglued joints with brass
screws. |
|
 |
| FIGURE
2 - Once the mid-cap is assembled, tilt the saw blade
10°. Then, after attaching a tall fence and featherboard,
make a beveled cut on all four faces of the mid-cap. |
|
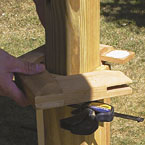 |
| FIGURE
3 - To install the mid-cap, remove the screws to separate
it into the two L-shaped sections again. Then apply exterior
glue, fit the sections together, and clamp the joints. |
|
|
|
Install
Upper Cladding
The final stage of converting a porch post to a column is to install
the upper cladding above the mid-cap. It's almost identical to the
lower cladding: 3/4"-thick cedar, locking rabbet joints, and L-shaped
sections that wrap the posts. The only difference is that here,
I routed a decorative chamfer on all four edges. This detail isn't
added to the lower claddings because trim pieces will cover those
corners once the railings are installed.
Porch Railing
A porch railing is required by most building codes. Therein lies
a dilemma: How do you construct a protective barrier that looks
and feels more like a friendly leaning rail?
This cedar railing does that well. It has a simple, straightforward
design. Combined with some simple trim pieces, the railing integrates
quite nicely with the porch columns.
Railing Basics
The Illustration below provides a quick overview of the railing.
Note how the upper and lower rails (2x4s) are connected by 2x2 balusters.
A 2x6 cap provides the crowning touch.
|
|

|
| RAILING
ASSEMBLY |
|
|
Rails - Cut the rails to length
to match the distance between the columns. As a decorative detail,
I routed a 1/2" chamfer in the bottom edges of the upper rail and
top edges of the lower rail (Top Rail Detail).
Balusters - As for the balusters,
it's just a matter of cutting them to length. Here, routing a 1/4"
chamfer on all four edges helps to "soften" the look of the balusters.
The top and bottom ends of each baluster are fastened to the rails
with a screw and a nail. The screw makes for a solid connection,
and the nail prevents the balusters from rotating.
|
|
| Rail
Cap - Although it's installed after the trim blocks, there's
no reason the rail cap can't be made in advance. It's 1-1/2" shorter
than the rail below it because the cap fits against a 3/4" trim piece
on each end. Wide bevels cut in the top face of the rail cap provide
a comfortable hand rest (Photo 4). And grooves routed in the bottom
create a drip edge. |
 |
| PHOTO
4 - After installing a tall auxiliary fence and featherboard,
tilt the table saw blade 5° and then rip a wide bevel on
both edges of the rail cap. |
|
Time for Trim
Once the railings are constructed, it's time
to install them on the porch. This is where the trim pieces I mentioned
earlier come into play.
The trim pieces do two things. First, they add depth to the lower
part of the column. And second, they capture the ends of the railings,
providing a solid connection with the columns (Railing Assembly).
All the trim pieces are made from 3/4"-thick cedar. Two of these pieces
form an L-shaped corner assembly that covers each corner of the column
(post trim). It's assembled exactly the same way as the post cladding
- with locking rabbet joints. The remaining pieces are just blocks
of wood attached to the columns one piece at a time. |
|
|
| POST
TRIM |
|
| The sequence
of attaching the trim pieces is important. It involves attaching the
first few trim pieces, and then using them to register the railing
as you slide it into place (decorative post & rail assembly).
Add the remaining trim blocks to complete the job. |
|
|
| DECORATIVE POST & RAIL ASSEMBLY |
|
|
| TRIM
CORNER DETAIL |
|
|