|
|
| Half
Lap How-To |
|
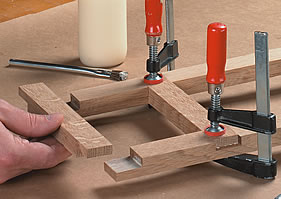
| Strong
and quick - two reasons why I use half-lap joints. They're
strong because a half-lap joint provides a large face-to-face gluesurface
(see Photo left). And they're quick because both workpieces can be
cut using one setup. |
 |
To cut a half-lap
joint, half the thickness of the stock is removed from each piece
so the two overlap and their faces are flush. A table saw and a dado
blade make quick work of this. Stock Thickness is Important - To ensure
accurate results, all your stock needs to be exactly the same thickness.
If it's not, you won't be able to cut the half laps so the mating
pieces are flush on both faces.
Blade Height is also Key - A second important factor is to
set the dado blade to the proper height. It should be exactly half
the thickness of the stock.
I start with a test piece and set the blade just under half the thickness
of the stock. (Make sure the test piece matches the thickness of the
workpieces.) Next, I make two passes, flipping the test piece over
after the first pass. This leaves a thin sliver of wood, as shown
in Fig. 1. Now to set the final blade height, raise the blade just
a hair and repeat this pass-and-flip process until the sliver is removed
(Fig. 1a). |
|
 |
|
| Set
a Stop - Once the blade height is set, the next step is to
set up a stop to establish the shoulder of the half lap. I use my
rip fence as a stop and set it so that the distance from the outside
edge of the blade to the fence matches the width of the workpiece
(Figs. 2 and 2a). |
|
| Cut
& Clean Up - Now you're ready to cut the end laps (Fig.
3) and cross laps (Fig. 4). To do this, use an auxiliary fence on
the miter gauge for the initial pass to establish one shoulder of
the lap joint. Then remove the rest of the waste in additional passes. |
|
| Some dado blades will
leave tiny ridges along the cheek of the half lap. To remove these
ridges, slowly move the piece side to side over the blade. |
|
|
|