| Cutting
Accurate Half-Blind Dovetails |
|
Many drawers
are held together with half-blind dovetail joints. One quick,
accurate way to cut this type of joint is with a router, a 1/2"
dovetail bit, a guide bushing, and a special dovetail jig.
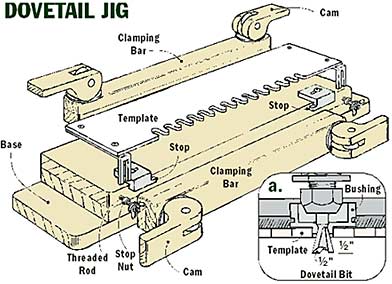
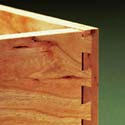
The half-blind dovetail jig is a comb-shaped template that fits
on a base, see the illustration below. The base has clamping
bars to hold the workpieces in place while the router is guided
in and out of the “fingers” on the template to cut
evenly spaced dovetails on a drawer’s front, back and
sides. |
 |
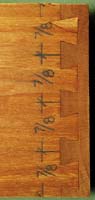
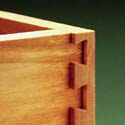
| To cut dovetail joints with
a router and template requires a little planning ahead. For
example, the drawer for the chest is exactly 4 3/8" wide.
I planned for this width so the opening would accommodate a
drawer joined with router-cut dovetails. That is, the width
(height) of the drawer front has to be a multiple of 7/8".
This produces a dovetail joint that’s symmetrical both
on the top and bottom edges, see the photo right. |
|
|
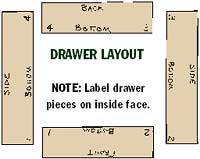
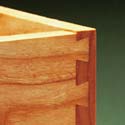
Another consideration
is the length of the drawer pieces. To make sure the corners
are square, check that the drawer front and back, as well as
the drawer sides, are equal lengths. Once the pieces are cut
to size, lay them out and label the bottom edge of each piece,
as shown left. Also, number the matching corners. |
 |
Set
up
Setting up the jig takes some trial and error, so I first used
some scrap pieces that are the same thickness and width as the
drawer pieces. Then I made test cuts, before going on to the
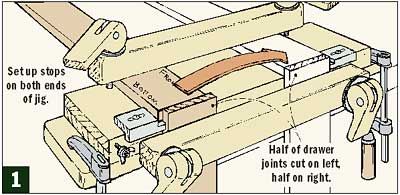
real thing. Start by mounting a drawer side under the front
pressure bar and a drawer front under the top bar. Note: The
bottom edges should be tight against the left-hand stop block,
and the insides of the drawer should face out (Fig. 1). After
the drawer front is clamped down, reposition the drawer side
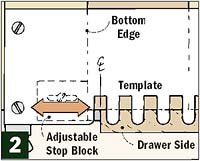
so the end is level with the drawer front. Next, mount the “comb”
template on the jig. The goal is to have the first notch of
the template centered on the bottom edge of the drawer side.
If it’s not, change the position of the stop block side
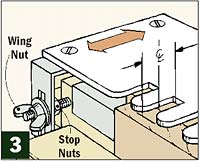
to side to adjust it (Fig. 2). Now hold the template flat on
the drawer front and tighten the wing nuts (Fig. 3). The location
of the stop nuts on the studs may take some minor adjustment. |
|
|
|
|
Router
Set-up
The router is guided in and out of the template with the aid
of a guide bushing (Detail a, of Dovetail Jig illustration above).
Next, mount a 1/2" dovetail bit in the router, making sure
the bit is centered in the guide bushing. If it’s not,
adjust the router’s base slightly. As for the depth of
the bit, start with it 1/2" deep (from the base), but you
may need to adjust the height of the bit.
Routing the Pieces
Now all of the drawer pieces can be
routed. To prevent chipout on the drawer sides, start by making
a light scoring pass, routing from right to left (Fig. 4). Then
gently move the router in and out of the fingers, this time
moving the router from left to right (Fig. 5). You should be
able to feel the guide bushing stop at the back of each notch.
After routing, but before removing the pieces from the jig,
check that you’ve routed each socket evenly and all the
waste is removed. Take a look at the Drawer Layout drawing on
page 1. You’ve now routed the joint at the left front
corner of the drawer (marked No. 1). Next, rout the right rear
corner joint (marked No. 3). Mount the drawer side on the front
of the jig, the drawer back on the top of the jig — with
the bottom edges against the stop on the left and the insides
facing out. The other two joints (No. 2 and 4) are routed with
the pieces tight against the stop block on the right side of
the jig. Again, always clamp the drawer side to the front of
the jig, the inside of the pieces facing out, and the bottom
edges against the stops (this time on the right).When routing
the right side, follow the same procedure as you did on the
left. |
|
 |
| To prevent
chipout on drawer side, start by making a light pass from
right to left. This creates a clean shoulder line. |
|
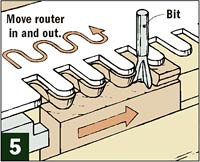 |
| Now move
router left to right, working in and out of notches. Bushing
must contact back of notch for complete cut. |
|
|

|
| Troubleshooting
Your Dovetails |
| Setting
up to make router-cut dovetails is always a trial-and-error
effort. You may need to fiddle around and readjust
trial pieces to get a perfect fit. See below for
pointers on how to fix possible problems. Most other
problems are usually caused by the pieces not being
clamped down in the jig so they’re flush across
the top, or because they move out of position as
they’re being routed. |
|
 |
| TOO
LOOSE: If joint is too loose, increase
bit depth. TOO TIGHT: If joint is too
tight, decrease depth. |
|
 |
| TOO
DEEP: If pins go deep, move template
toward you. TOO SHALLOW: If not deep
enough, move toward jig. |
|
 |
| OFFSET:
If pieces don’t align at top or
bottom, they may not have been tight
against the stops. |
|
|
|
|
|
|